Welcome to the user guide for the Play and Perform online entry system. In here you will find step-by-step
instructions on how to do everything from viewing a syllabus to completing your entries.
This guide is made up of sections that cover the most common
things you will need to do while using the online entry system. As an introduction they are listed below along with links to take you straight to where you want to get to.
Explains what the system does for you and the festival.
Explains how to use the system and what those icons and buttons do.
Shows you to find the one you want and how to view and download a copy.
A step-by-step guide to entering a class. This includes payment so if you have a question about paying by debit/credit card or Paypal this is the place to look.
How to create a new entrant/performer.
How to create a new ensemble or group, and how to add members to it.
Shows you how to review the entries you have in your basket. If you have to update the details of an entry (which entrant/performer, or the members of an ensemble for example) this will tell you what you can change and how to do it.
Shows you how to view all of the entries you have made and submitted to the festival.
Shows you how to review all the entries you have made. If you have to update the details of an entry (the name of a piece for example) this will tell you what you can change and how to do it.
If you would like to make a donation this explains how to do it.
View a summary of the entrants/performers you have created, update their details or even delete them.
This is the place to to see how you can update your account details (change your email address or password, for example)
What is the Online Entry System?
The Play and Perform Online Entry System is the link between the festival and you. The festival organisers use it to publish the details of what is happening and it helps you explore them and make your entries to the festival. It is intended to be an easy-to-use tool that lets you do what you need to do quickly and easily.
You can view or download the syllabus for each section you are interested in, make your entries and pay for them.
When you have made your entries the system will email you confirmation of all your classes, and when they are ready it will send a personalised timetable for each person that has entered the festival.
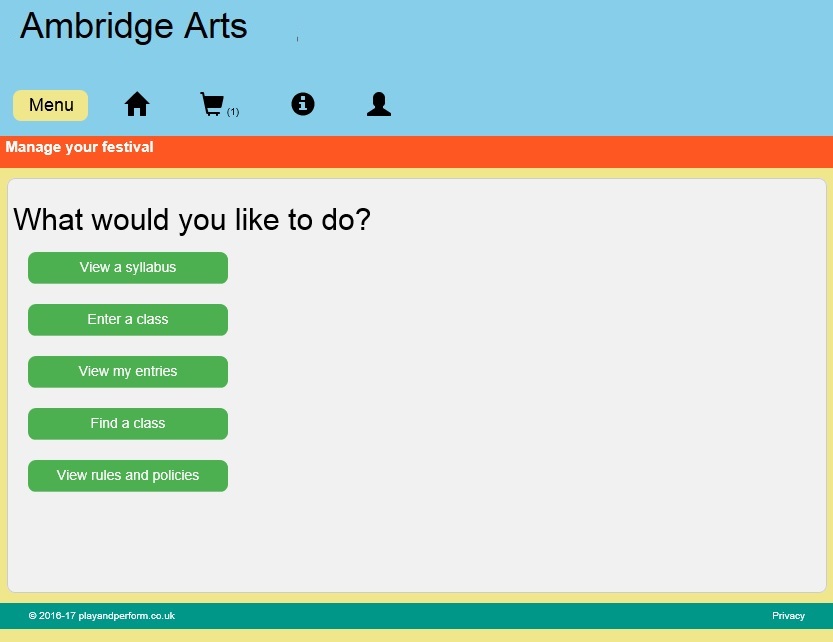
Navigating Your Way Around Play and Perform
Finding your way around Play and
Perform is simple - at the top each each page there is a Menu button and a number of icons to allow quick and easy access to whatever you want to do:
Click on any of the icons or buttons to access the service you want to use.
The account icon gives you the option to view and update your account details, or to log out of Play and Perform.
The 'information' icon provides links to Frequently Asked Question (faqs) about the online entry system and to the user guide (this document).
The basket icon will show you entries you have added to your basket but have not completed and paid for (remember items in your basket have not been submitted to the festival).
The 'home page' icon will take you the online-entry system's main page (the one you see when you first log in).
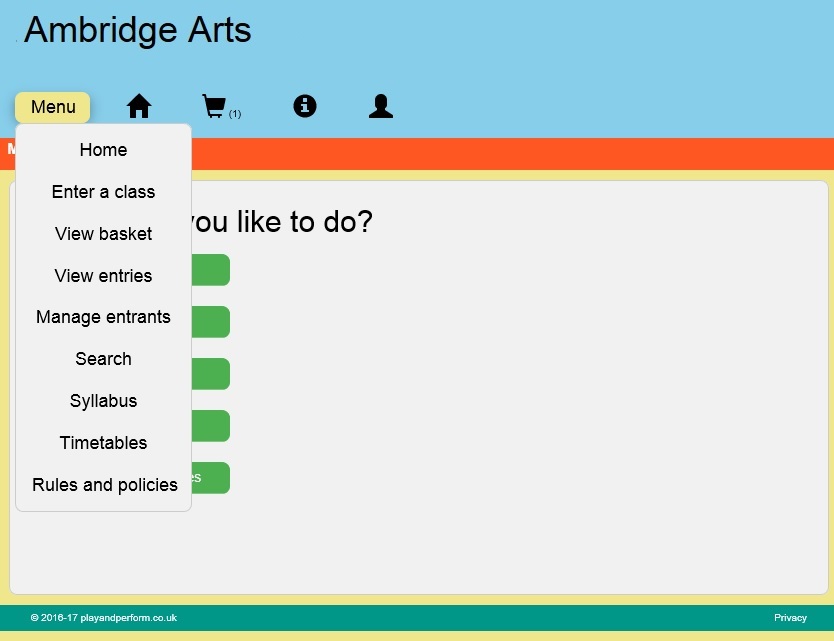
The 'menu' button will show a drop-down menu of all the services available.
Wherever you are in the system, when you click on the home page button you will be taken back to the main page (the first one you see when you log in), as show below:
You can also quickly navigate your way to any of the services available in Play and Perform by clicking on the 'Menu' button that is shown at the top of every page. Clicking on it will display a drop-down menu of all the services - just click on the one you want to move straight to it.
Other icons or symbols you may come across include:
This shows you where context-specific help is available. Where you see this you can click on it to get an explanation for what Play and Perform is asking you to do.
This is the 'pen' edit icon. Where you see this you can click in it to edit some information about your entries or entrants/performers.
This the 'bin' delete icon. Where you see this you can click to
delete an entry or entrant/performer.
And finally, while you're exploring this guide if you ever want to get back to the top click where you see this button:
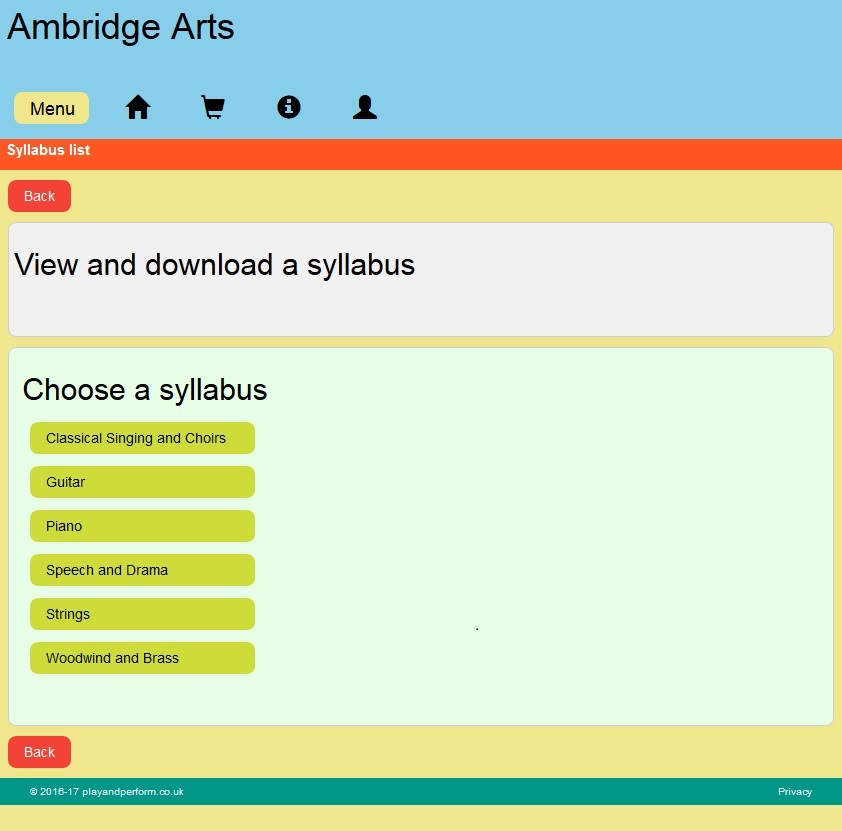
Viewing a Syllabus
There are two ways to view a syllabus:
1) From the home page click on the
'View a syllabus' button and a list of available syllabuses will be shown to you.
2) Press the 'Menu' button and select 'Syllabus' from the drop down list of options to see a list of syllabuses.
Simply click on the name of the
syllabus you want to look at and it will be displayed. At the top of the syllabus a 'clickable' table of contents is shown - for example if you want to view the rules you can click the 'Rules' heading and you will be taken straight to them.
If you would like to download a copy of the syllabus click the'View PDF' button at the top of the syllabus page. Depending on your browser you will either be asked if you would like to download and save the document, or a new browser window or tab will be opened from where you can download the document. You will need a PDF viewer (e.g. Adobe) to view and print the syllabus.
Enter a Class
There are four steps to entering a class and submitting that entry to the festival:
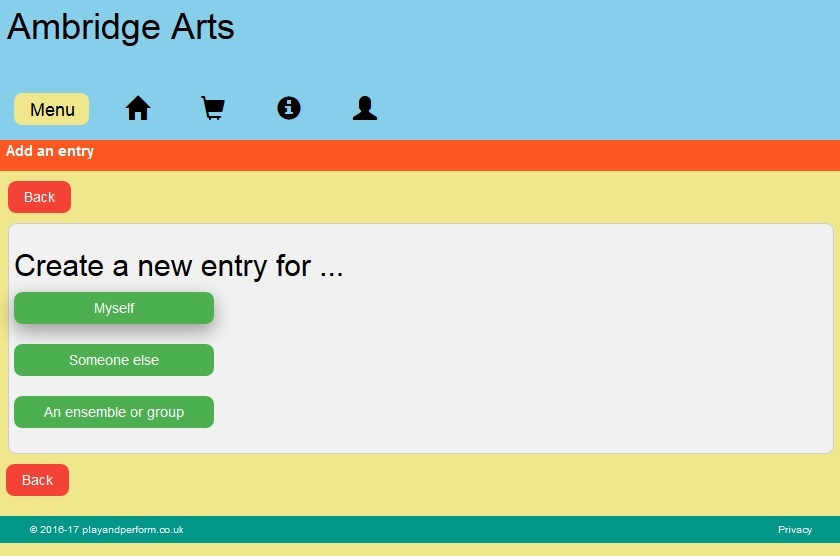
1. Choose or create entrant/performer
From the home page click on the 'Enter a class' button
-or-
Press the 'Menu' button and select 'Enter a class ' from the drop
down list of options.
Choose from the three options presented to you ('Myself', 'Someone else', or 'An ensemble or group').
If you choose 'Myself' you will be asked to complete some personal details (if you haven't already) and then to choose which classes you would like to enter.
If you need to provide details about yourself you will see the
following page. Complete the form with the required information and click on 'Submit'.
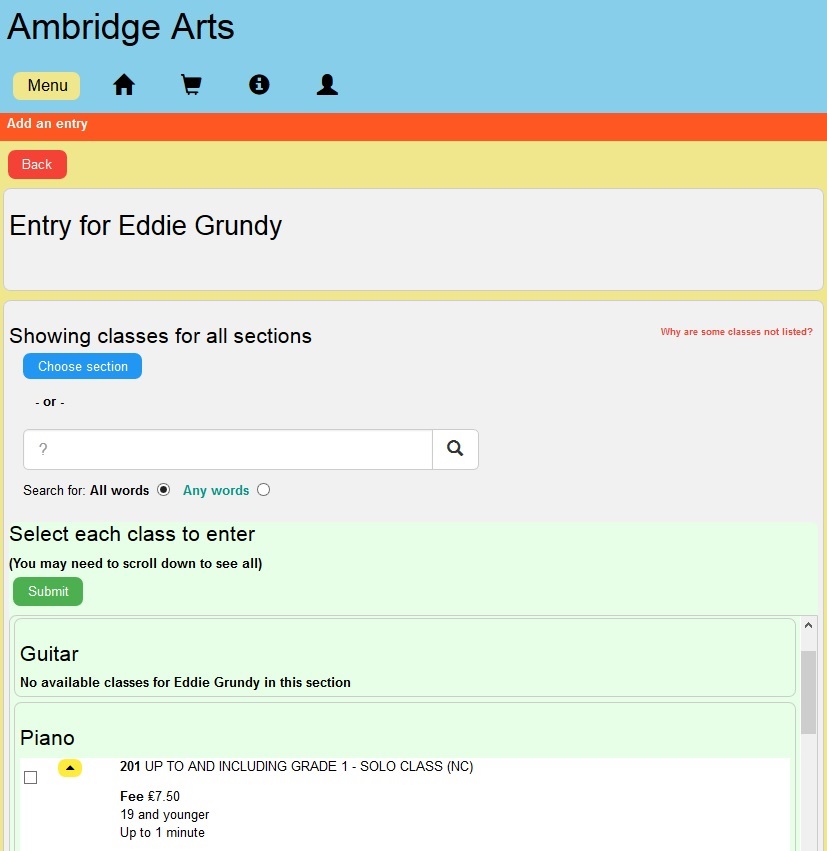
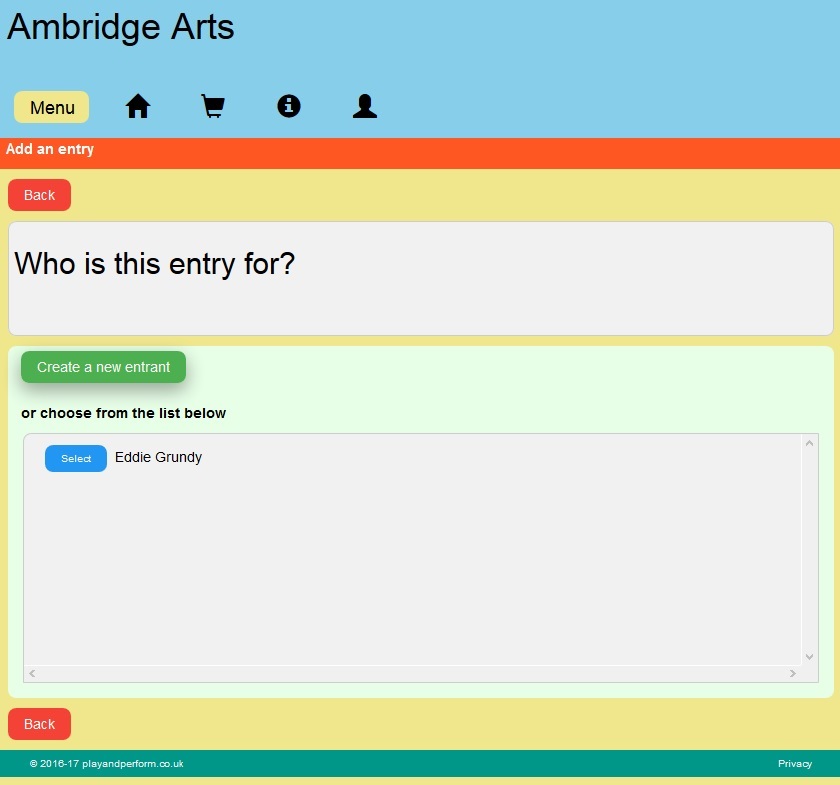
In the example below, a user of the online entry system (Eddie
Grundy) has clicked on 'Myself' and all classes available to him are being shown. Only classes that are open to him are shown – for example, in this case Eddie Grundy is 12 years old and only solo classes open to someone of that age are included.
If you choose 'Someone else' (for example, a pupil or your child) you will be prompted to choose from any entrants/performers you have already
created, or to create a new entrant and provide any details that are needed. You will then choose the classes to be entered.
If you choose 'An ensemble or group' you will be prompted to choose from any ensembles you have already created, or to create a new ensemble. If you need to, you can create new entrants to be part of the ensemble. You will then be able to choose the classes to enter.
2.
Choose classes
Once you have selected or created the entrant you can choose all the classes available will be shown:
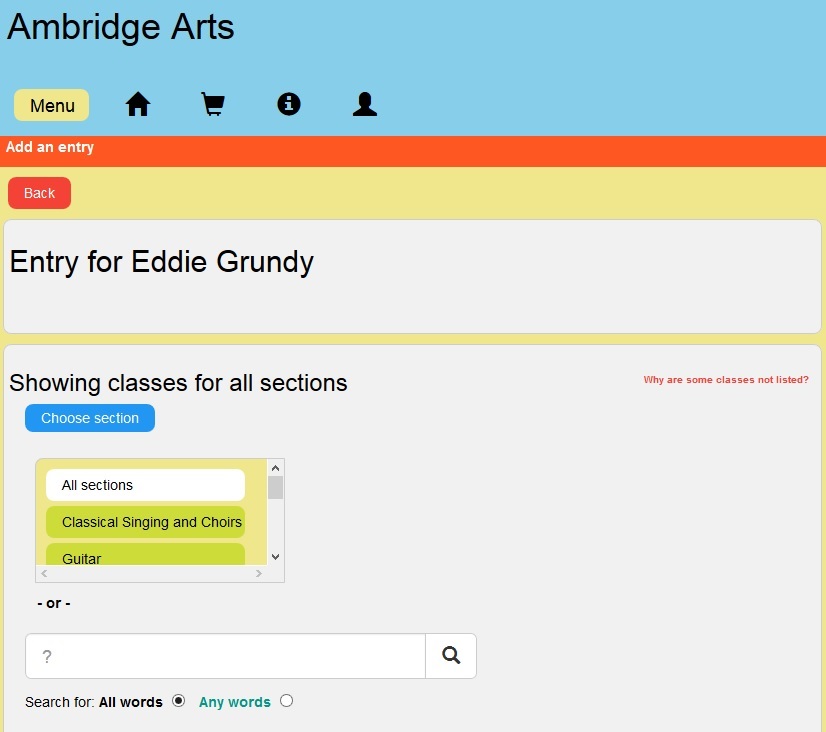
You can restrict the classes displayed by section, or search classes.
To limit classes to a specific section click the 'Choose section' and a drop-down list will be displayed and you can click on the one you want, as shown below.
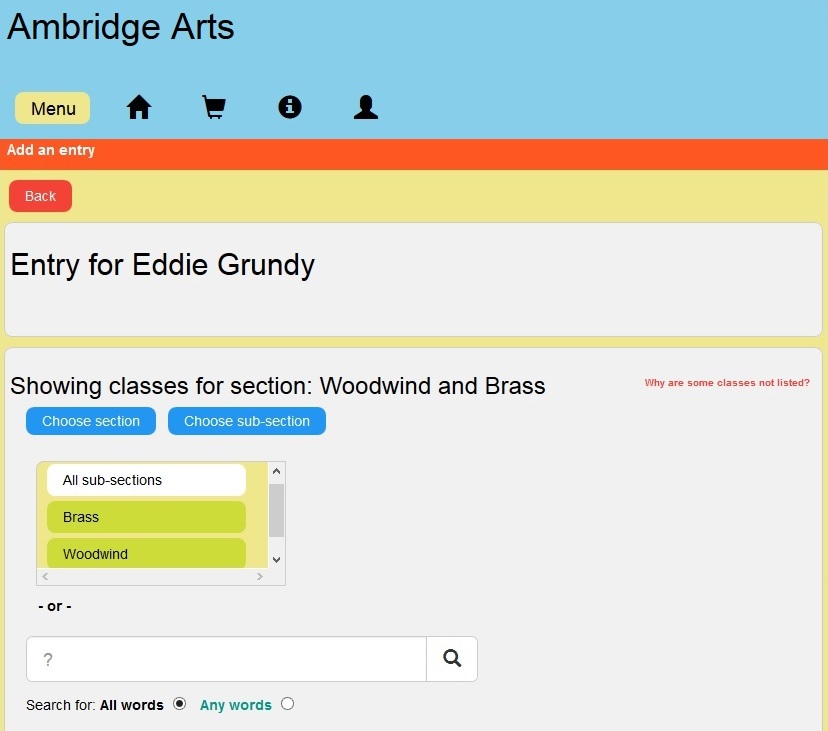
Some sections may contain sub sections. For example there may be a Woodwind and Brass section which contains two sub-sections – one for woodwind and one for brass. If that is the case you can further limit the classes shown by choosing the sub-section to be displayed, as shown below.
Alternatively you can search for classes using the search box – enter a keyword or a class number and Play and Perform will search for classes matching your criteria. If you enter 'violin' and 'viola' and select 'Any words' the system will display classes that contain either of those words in their name or description; if you select 'All words' the system will display only classes that refer to both violin and viola.
You will then be able to choose the classes to enter. Click in the box on the left hand side of the class you would like to enter (you can select as many as you want) and a tick will appear to show it has been selected. If you make a mistake or change your mind just click in the box again to deselect a class.
Once you have selected all the classes for the entrant or ensemble click on 'Submit'.
3.
Provide optional information
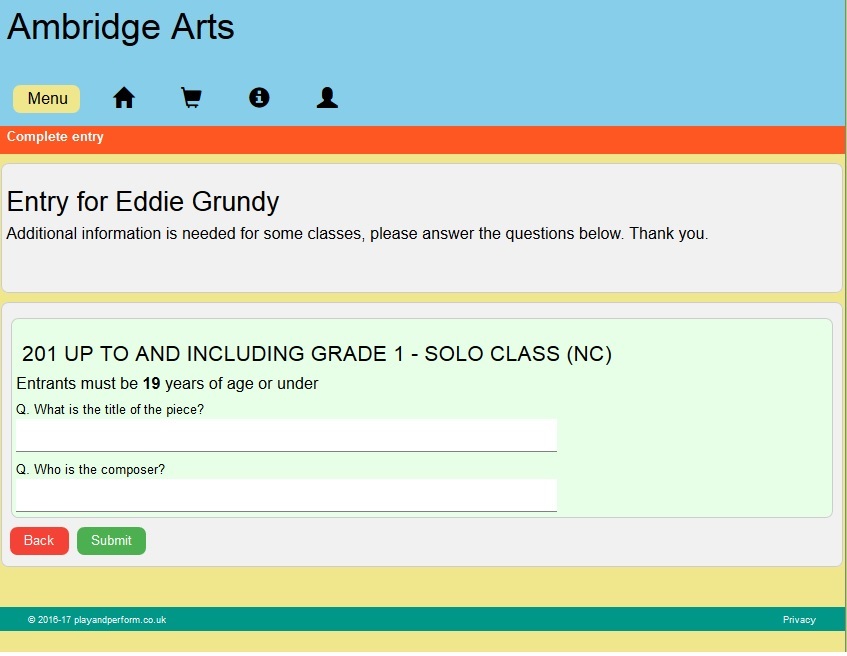
Once you have selected all the classes for the entrant or ensemble click on 'Submit'. If any additional information is required (for example the name of a piece or the instrument to be played) you will be asked to provide the details.
When all the required details (if any) have been entered a summary of the classes in your basket will be displayed. You can choose to make more entries (for the same entrant or a different one) or complete and pay for the entries.
4. Complete entry and pay
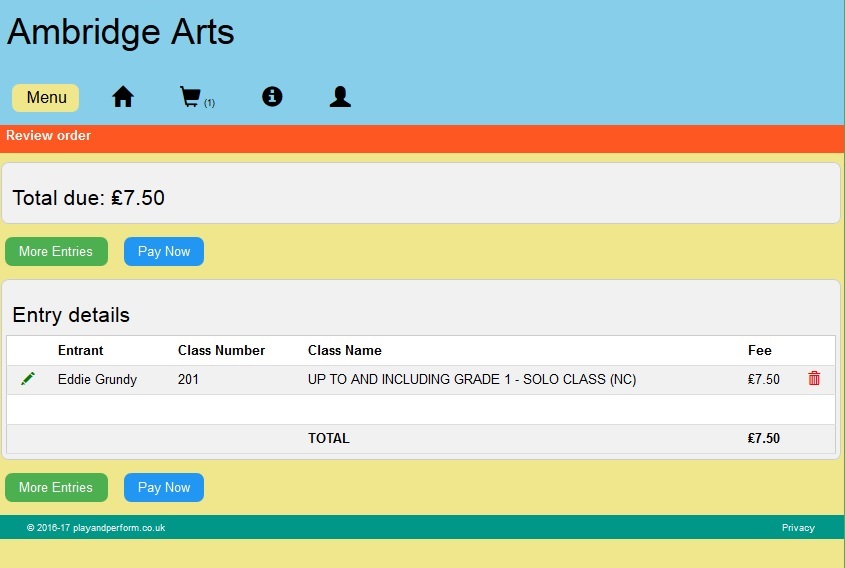
Having selected the classes you want to enter and provided any additional details required you can review your entries and continue to the checkout and pay.
You can choose to make more entries (for the same entrant or a different one) by clicking on 'More entries' or complete and pay for the entries by clicking on 'Pay now'. Click on 'Pay now' to move on to the next stage:
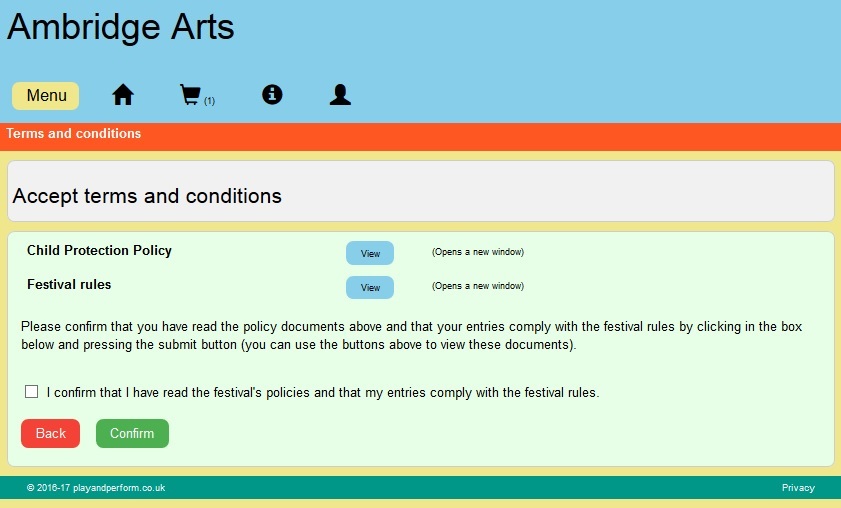
You will be asked to confirm
acceptance of any festival rules and policies that apply to your
entry. You can view these by clicking on the 'View' button on this page (they are also available at anytime by clicking on the 'Menu' button at the top of the page and selecting 'Rules and Policies'.
Click in the box to show your
agreement and then click on the 'Confirm' button to continue. You
will be asked if you would like to make an optional donation to the festival in addition to the entry fee (if you opt to do this you will also be asked if the festival can apply Gift Aid to your donation). See here for details on donations and Gift Aid.
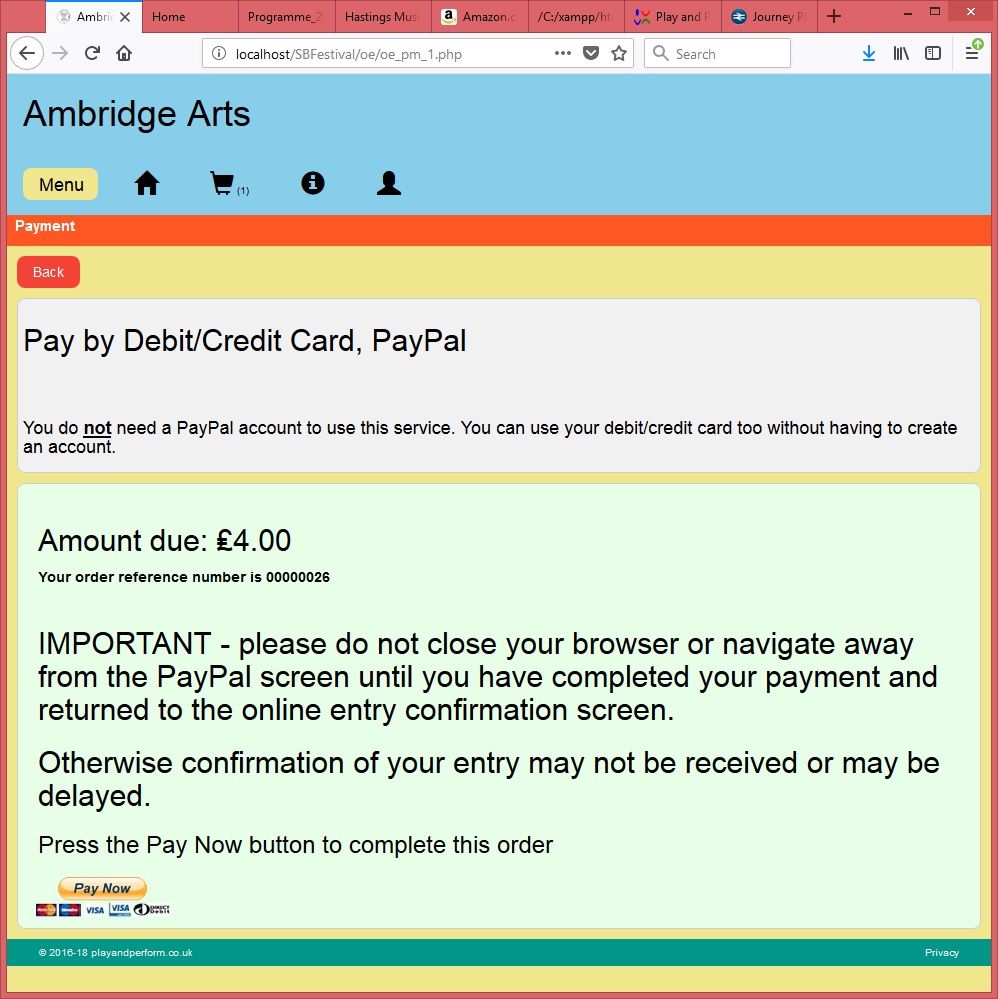
The last stage is to make payment to complete your entries to the festival. Paypal is used to take online payments by the festival but you DO NOT NEED a Paypal account to use this service – you can pay with your debit or credit card without a Paypal acount. The total amount due is displayed showing the fees due, any donation you may have opted to add, and any charges applied by Paypal. For example:
Click on the 'Pay Now' button to make your payment. This will take you to the Paypal payment service where your payment will be taken:
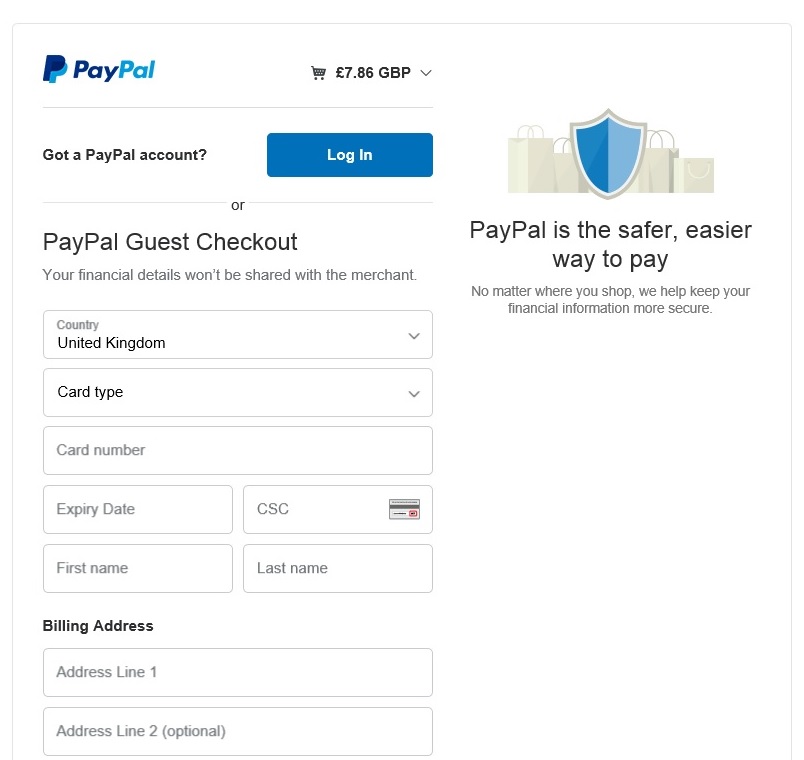
You can pay with your debit/credit
card or sign in and pay with your own Paypal account – the
choice is yours.
Please note that all payment details are collected and processed securely by Paypal. Neither Play and Perform or the festival have any access to your personal details, card details or Paypal account.
Once you have completed your payment you will be returned to the Play and Perform online entry system and an email will be sent to you confirming details of your entries.
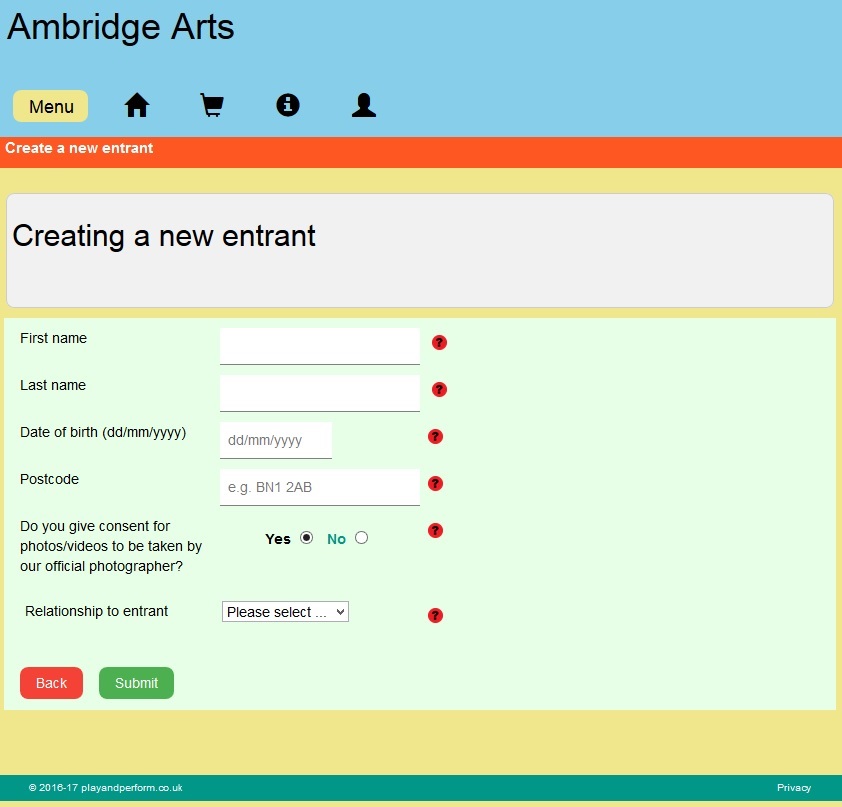
Create an Entrant/Performer
If you are making entries on behalf of someone else you will need to
create a record of that person so that their details can be submitted to the festival. This applies if they are being entered for individual events or as a member of an ensemble or group. You only need to do this once for each person – when you have created a record of a person you enter them for multiple and individual classes without having to go through this step again.
A note on terminology - in Play&Perform the person being entered in a class is called the Entrant or Performer. Some festivals refer to the person using the system making the entry as the entrant, but that is not the case in the online entry system.
When you have selected the option to enter a class and have chosen 'Someone else' you will be presented with following:
Click on the 'Create a new entrant' button and you will be asked to complete the following form:
The last question is about you rather than the entrant – are you the parent, teacher, guardian or 'other'?
Once you have completed the form and pressed 'Submit' you will be
make entries for this person in individual or ensemble/group classes.
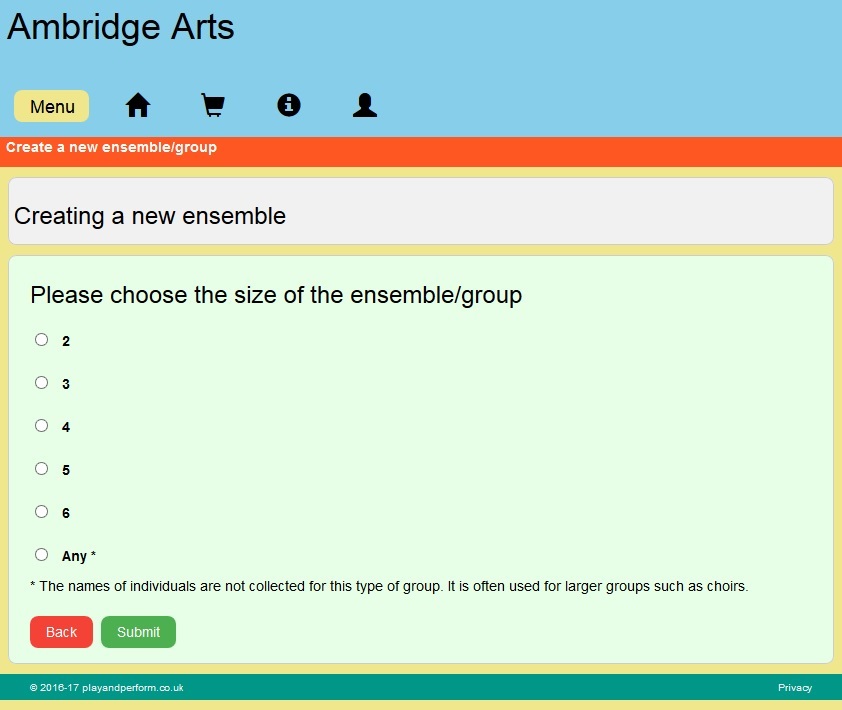
Create an Ensemble or Group
As an example, if the first entry you want to make after creating
your account for the online entry system is for an ensemble you will have selected 'Enter a class' and then picked 'An ensemble or group' the following page will be displayed:
Select the size of ensemble or group to be created. If it is 6 or
less you will be asked to provide details of each member (if you
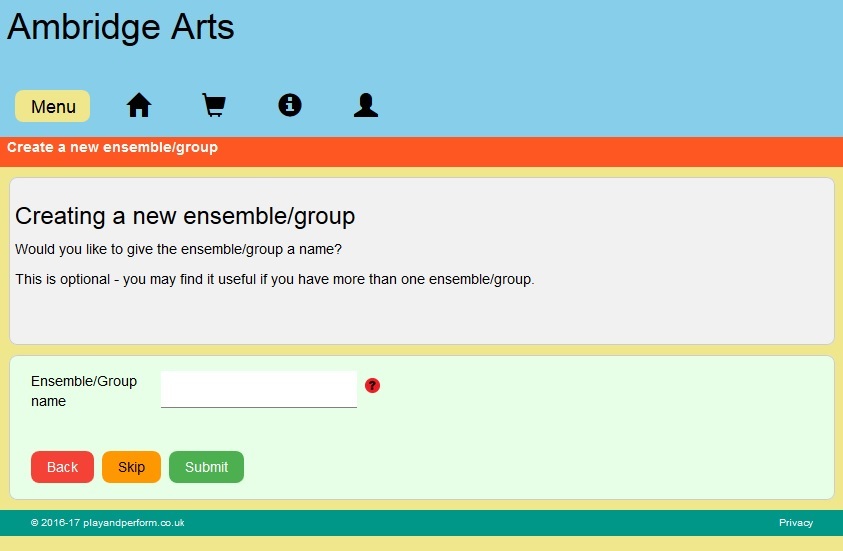
select 'Any' you may asked by the festival directly to provide
details of all those taking part). If you select 'Any' you will be asked to give the group a name as shown in the illustration below. (Smaller groups are automatically named with their member's names and are not shown this. If you want to give the group a different name you can edit it after creating the group by clicking on Menu and then Manage Performers)
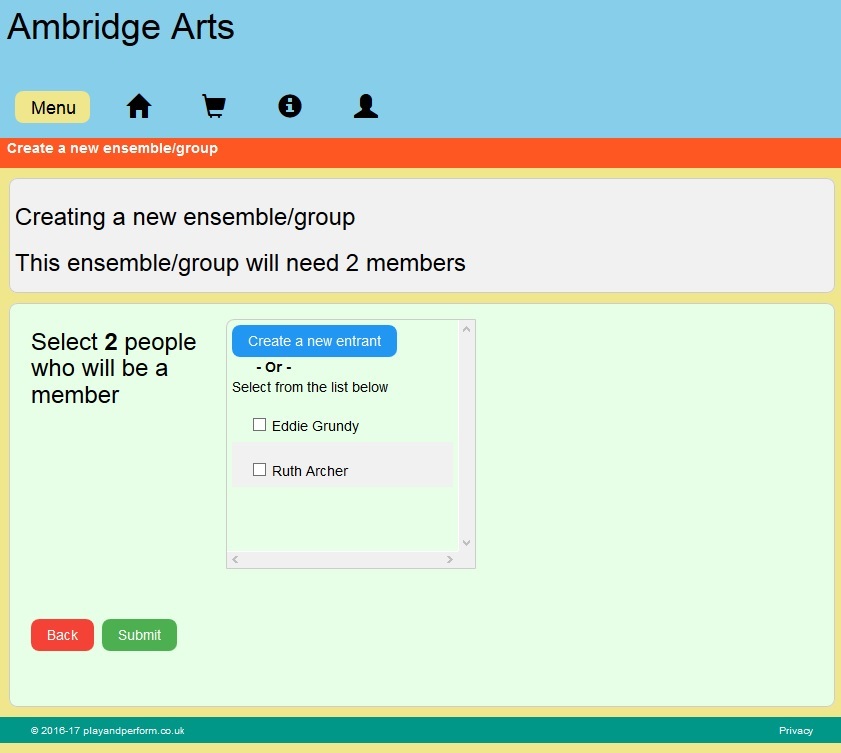
In this example we will create a duo. You will be asked to select their names from those entrants you have created (if any) or to create a record for each new entrant. Your name will also appear in the list of potential entrants. In this example user Eddie Grundy has chosen to create an ensemble of two people and has not given it a name. He has already created an entrant (Ruth Archer) so can choose himself and Ruth as members or could create another entrant to add to the ensemble by clicking 'Create a new entrant'. If he did create a new entrant , once the details had been added he would be returned to the page below to continue selecting members for the ensemble. Eddie chooses himself and Ruth as members and presses 'Submit'.
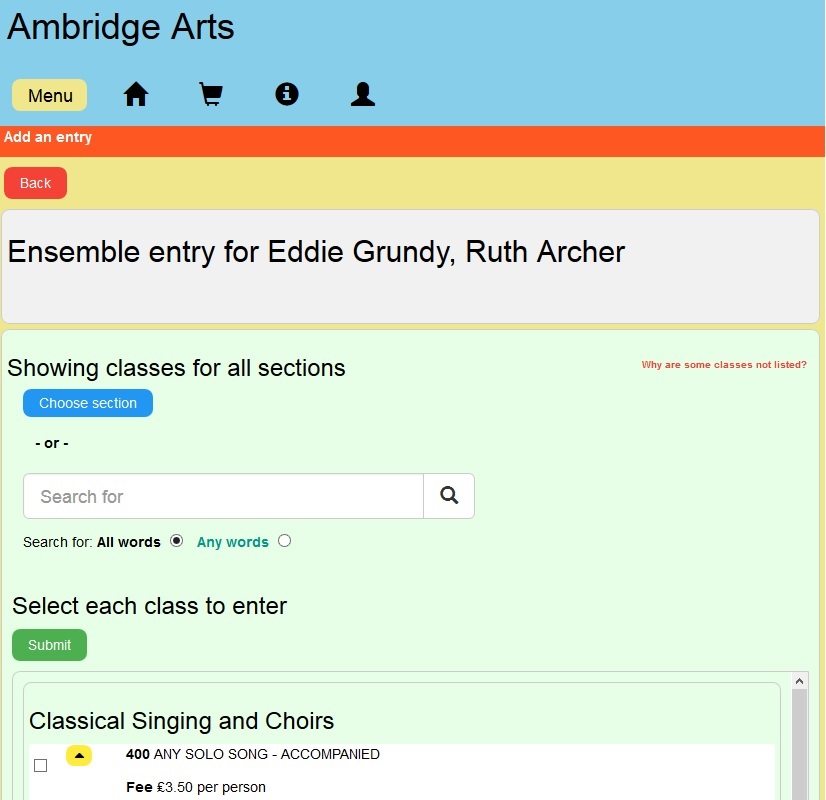
The system will display all classes open to duos that match Eddie and Ruth's age:
Eddie can now select each class he would like the newly created
ensemble to enter.
For a second example, if Eddie has opted to create another ensemble entry he will be asked to choose which ensemble from those he has already created or to create a new one:
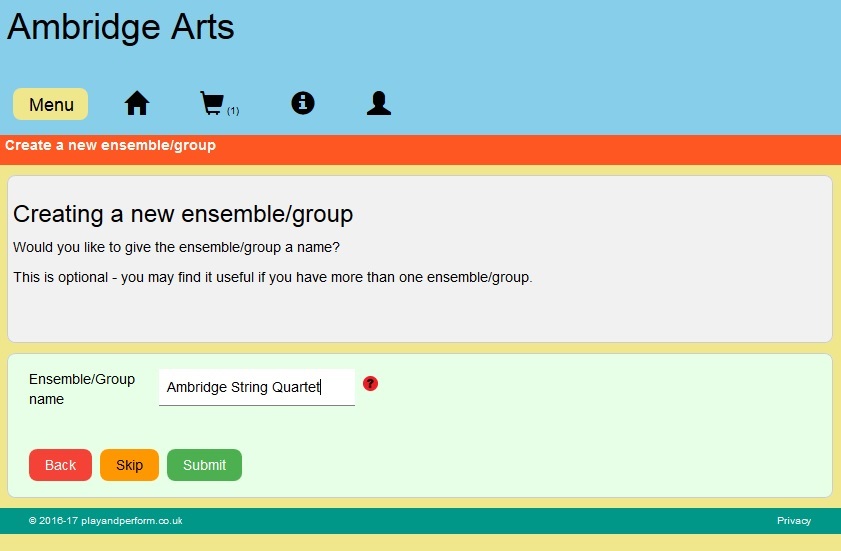
Eddie wants to enter a string quartet to to the festival so he clicks on 'Create a new ensemble' and selects a size of four. This time he wants to give the ensemble a name, which he does by filling in the box and pressing 'Submit':
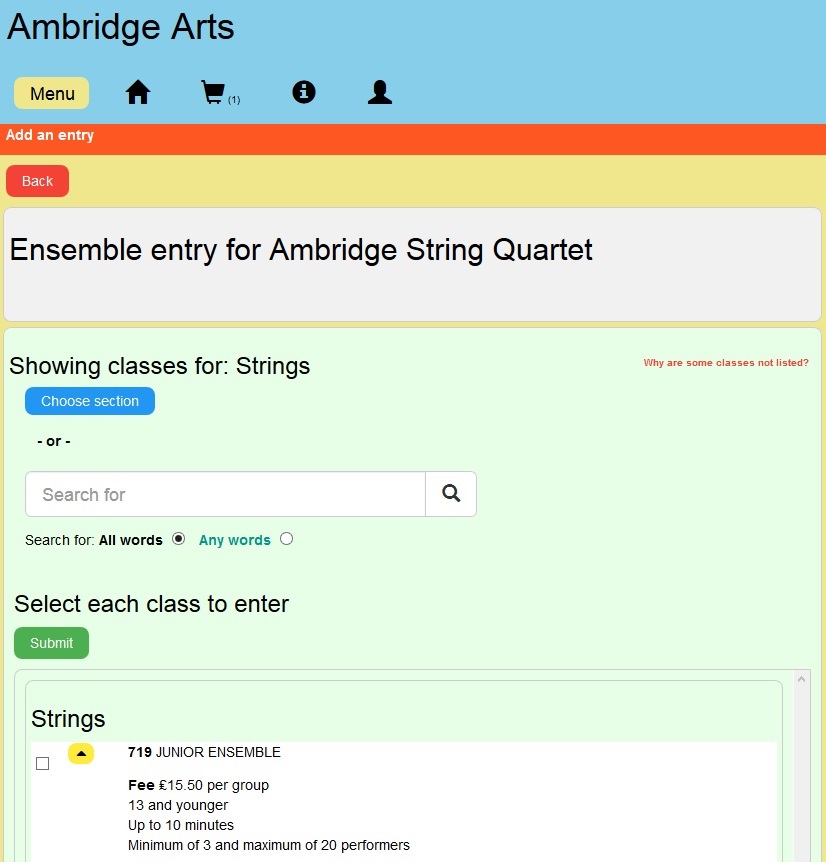
Eddie now has to select the members of the quartet:
As Eddie has two potential members of the quartet (himself and Ruth) he presses the 'Create a new entrant' button and creates two more entrants. Having done this Eddie can select the members of the quartet by clicking the box alongside each person and then pressing 'Submit'. Then he can choose which classes to enter from those available to an ensemble of four people:
Update Entries
If the festival has allowed it you change or correct the details of an entry. Click on Menu -> View entries to see a list of your entries that have been submitted. If updates are permitted a green pen is displayed next to each entry - click on this to make your changes.
Note, if the festival does not permit changes to submitted entries (i.e. no longer in your basket) you will need to contact the festival administrator.
While it is still in your basket (which means it has not yet been submitted to the festival) you can change all of the information or delete the entry completely.
Note, if you need to change details of an entry already submitted to the festival (i.e. no longer in your basket) you will need to contact the festival administrator.
Click on the shopping basket icon at the top of the screen to review the contents of your basket:
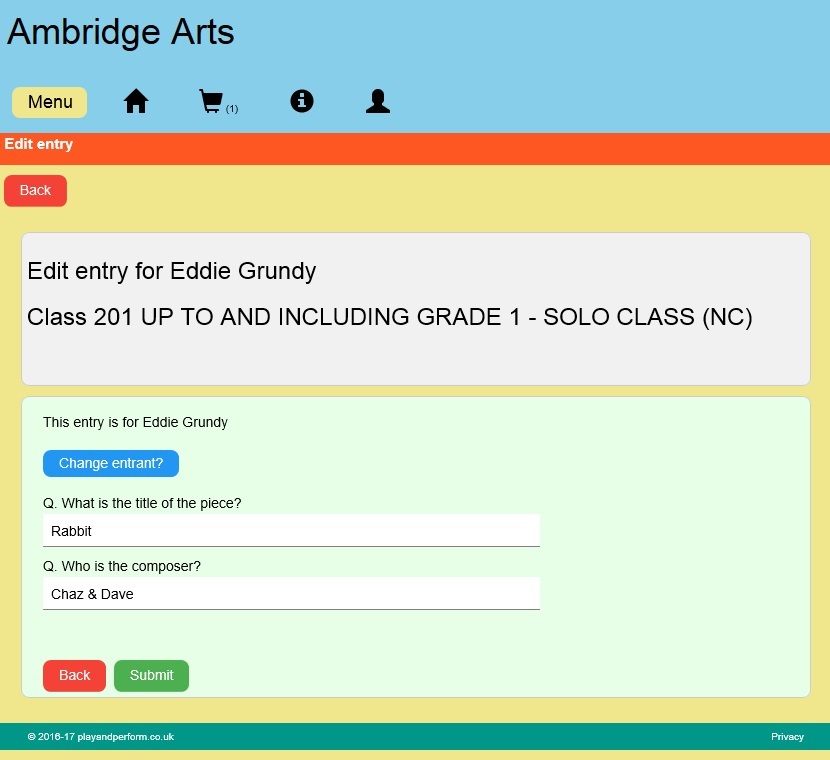
To make a change to the entry click on the 'pen' icon to the left of the entry and you will be able to change the entrant, or if there was additional information required for the class you can update that too. If you prefer you can click on the bin icon to the right of the entry to remove it completely. If you do delete an entry the entrants are not deleted so you can continue to create new entries for the person concerned without having to add all their details again.
In the example entry above you can
make changes as shown below:
Once you have made the changes click on 'Submit' to save the changes.
View Entries
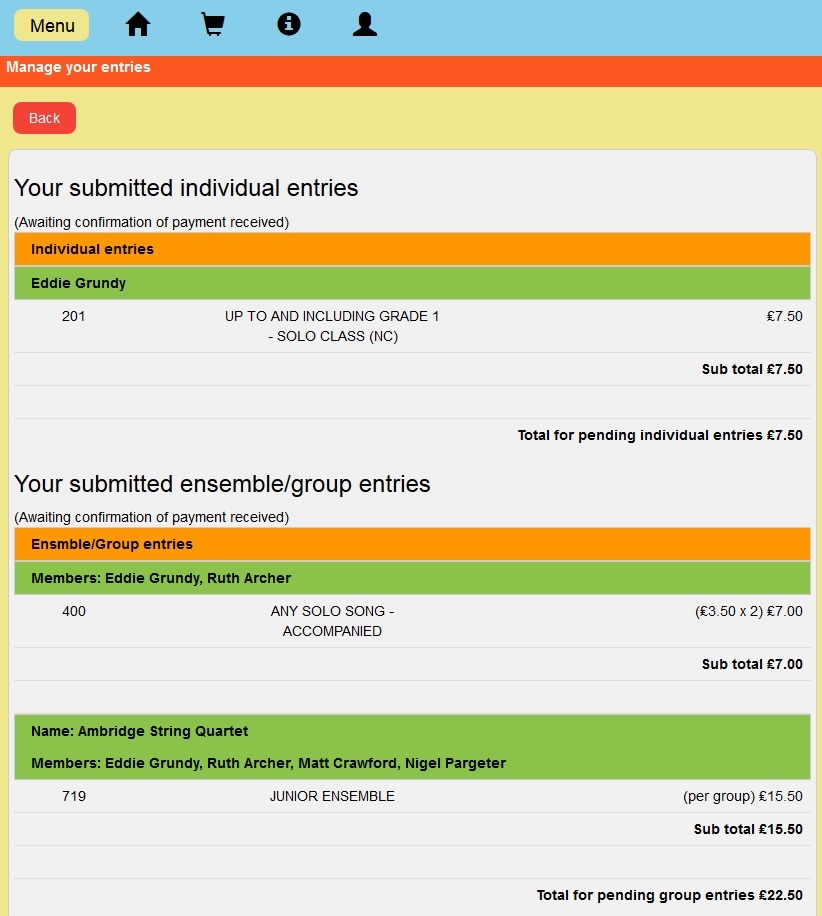
You can view all the entries you have made and submitted to the festival at any time (remember this does not include those that are in your basket).
From any page press the 'Menu' button at the top of the screen and select 'View entries' from the drop-down list and a page similar to the one below will be displayed.
The names of entrants, the classes they have been entered for and the fee for each is displayed, and if you entered additional information (such as the name of a piece for example) this will also be shown.
Your entries will be grouped into individual entries (class 201 in the example above), followed by any ensemble/group entries (classes 400 and 719 above).
Rules and Policies
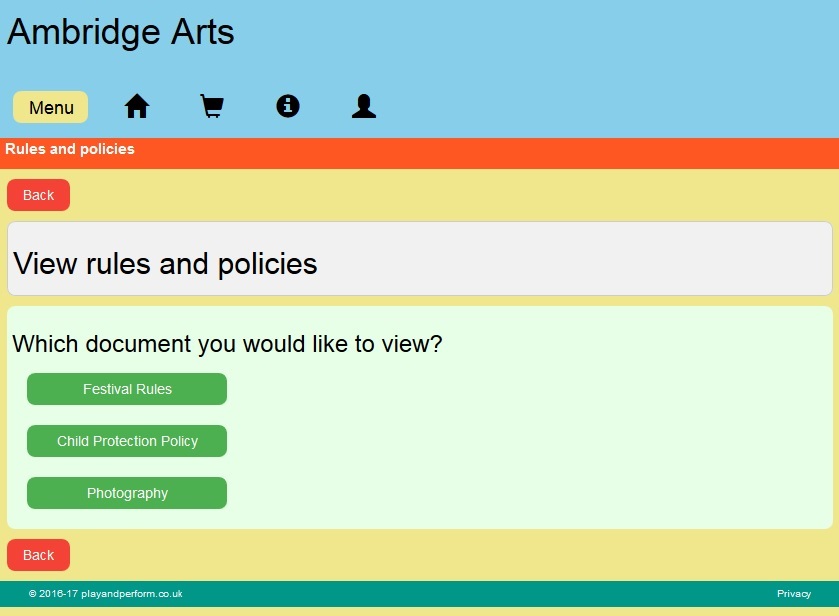
The festival has rules and policies that must be agreed to as part of entering a class and you are asked to confirm that you have read and accept them when you go to the checkout to pay and complete your entries. At that time you can view the rules and policies by clicking on the 'View' button:
You can also view them at any time by either clicking on 'View rules and policies' on the home page, or clicking on the 'Menu' button from any page and selecting 'Rules and policies'. A page showing all of the rules and policies available will be displayed, as shown below, and clicking on each button will display the relevant rule or policy document.
Donations and Gift Aid
The festival is a registered charity and has to raise all of it's
funding through entry fees, donations and sponsorship. Any donation is very welcome and is an important part of the festival's fundraising. In addition, Gift Aid provides a valuable boost to all donations, so if you are a UK tax payer it would be very helpful if you are able to let the festival claim that tax back.
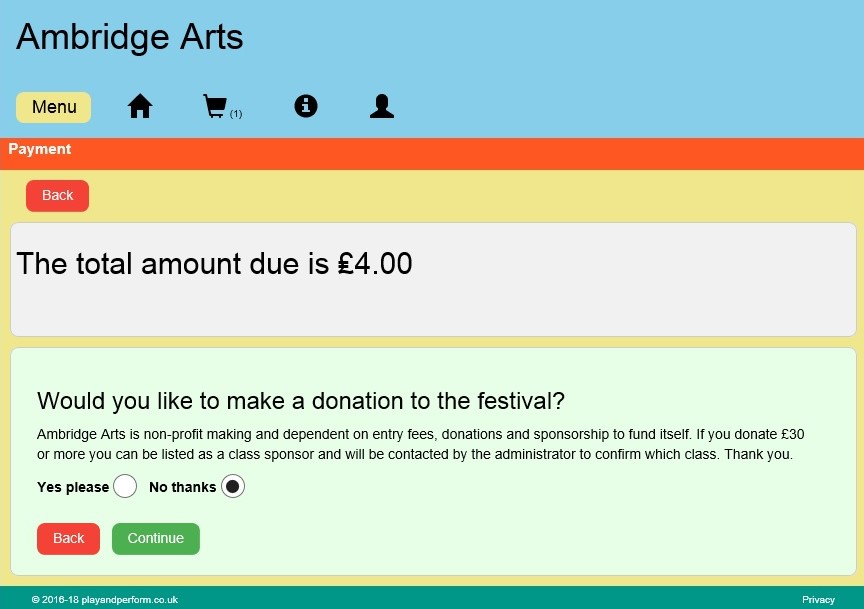
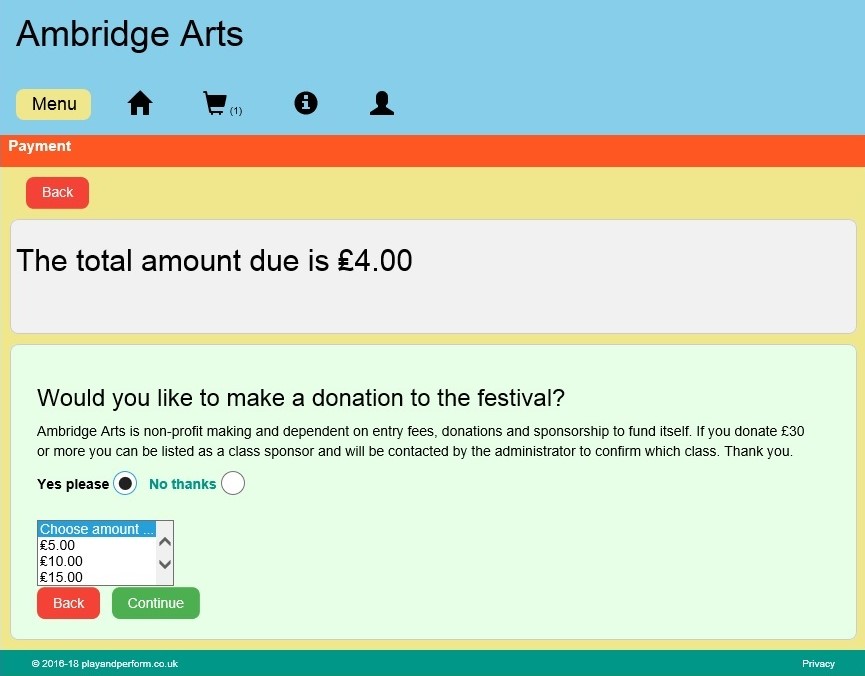
If you would like to make a donation to the festival you can do this when paying for your entries. After you have accepted the terms and conditions of the festival during the checkout process you will be asked if you would like to make a donation when the following page is displayed:
If you feel that you would like to do this, select 'Yes please' and click on the 'Continue' button and you will be asked to select an amount:
When you have chosen the amount you would like to donate click on
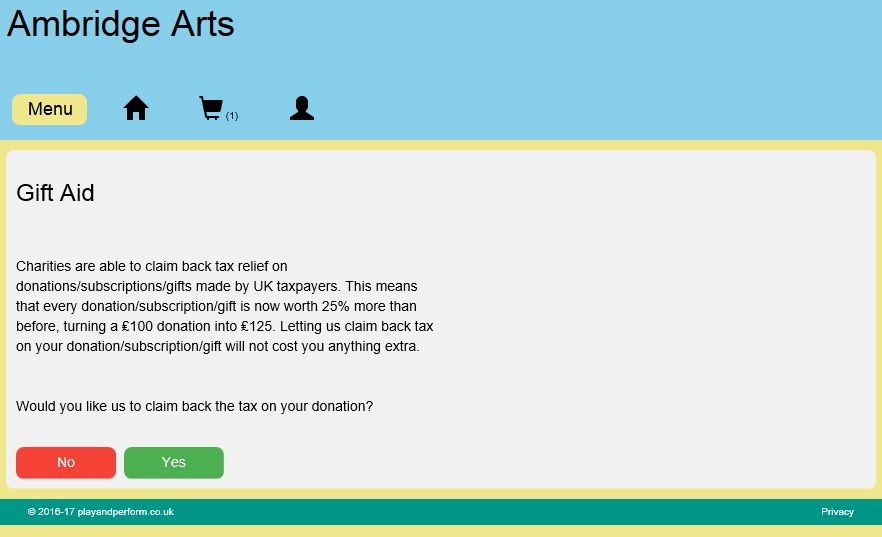
'Continue' again. You will then be asked if the festival can claim Gift Aid on your donation.
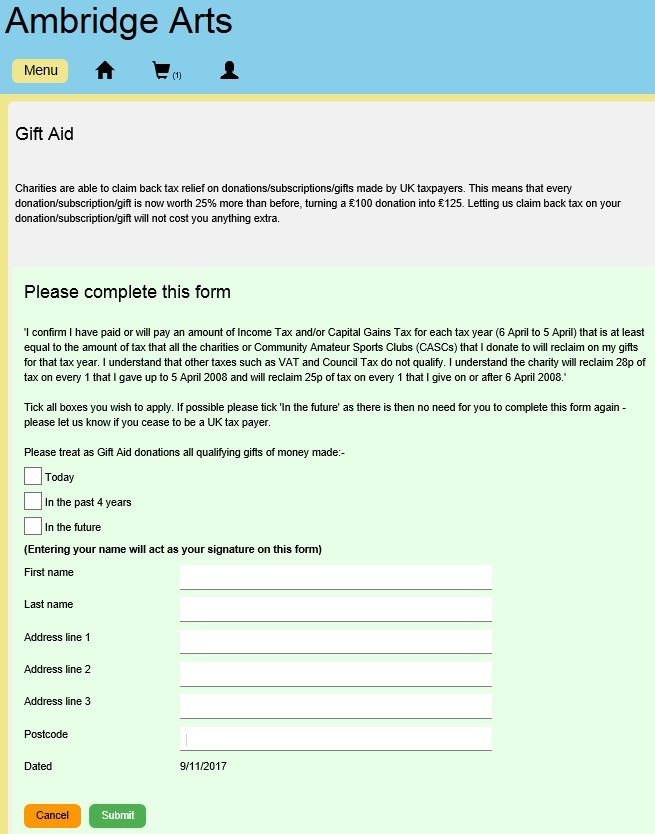
If you are able to allow the festival to claim Gift Aid you will be asked to enter your address and re-enter your name. This acts as your signature for the purpose of claiming the tax back from HMRC.
Manage Entrants
You can view a summary of entrants you have created and also correct or update some of their details (note you will also appear in the list of entrants – all users of the online entry system are treated as potential entrants in their own right).
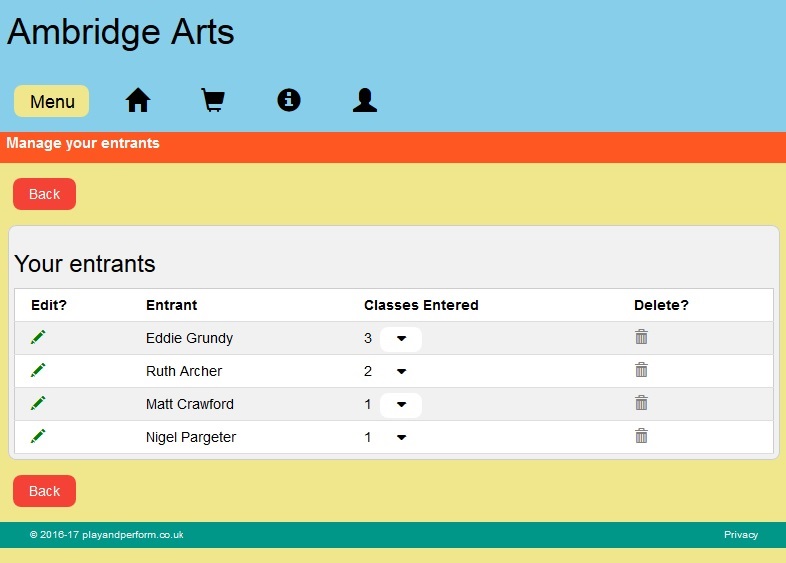
From any page click on the 'Menu' button and select 'Manage entrants' from the drop-down list and a summary page will be displayed. In the example we have been using in this guide Eddie would see the following:
In this example Eddie appears at the top of the list followed by the three other entrants he has created. The 'Classes Entered' column shows the number of classes entered for each entry (Eddie has entered 3, Ruth 2, and Matt and Nigel 1 each). Clicking on the arrow beside the number of classes will display a list of each class entered.
Clicking on the 'pen' icon allows you to update some of the details for each entrant. You cannot change or correct the date of birth if the corrected date would give an invalid age for any classes already entered. For example if Ruth had a date of birth that made her 10 years old and she had already entered classes open to anyone aged 10 or under, and her date of birth was changed to give her an age of 11 that would not be allowed as it would breach the age rules for the class already entered. You will need to contact the festival administrator to resolve this.
If the bin icon in the right hand
column (under the 'Delete?' heading) is grey you cannot delete the entrant because they are entered into at least 1 class (you can never delete yourself either even if you have not entered a class). If the entrant has not been entered for any classes the bin icon will be red and the entrant can be deleted.
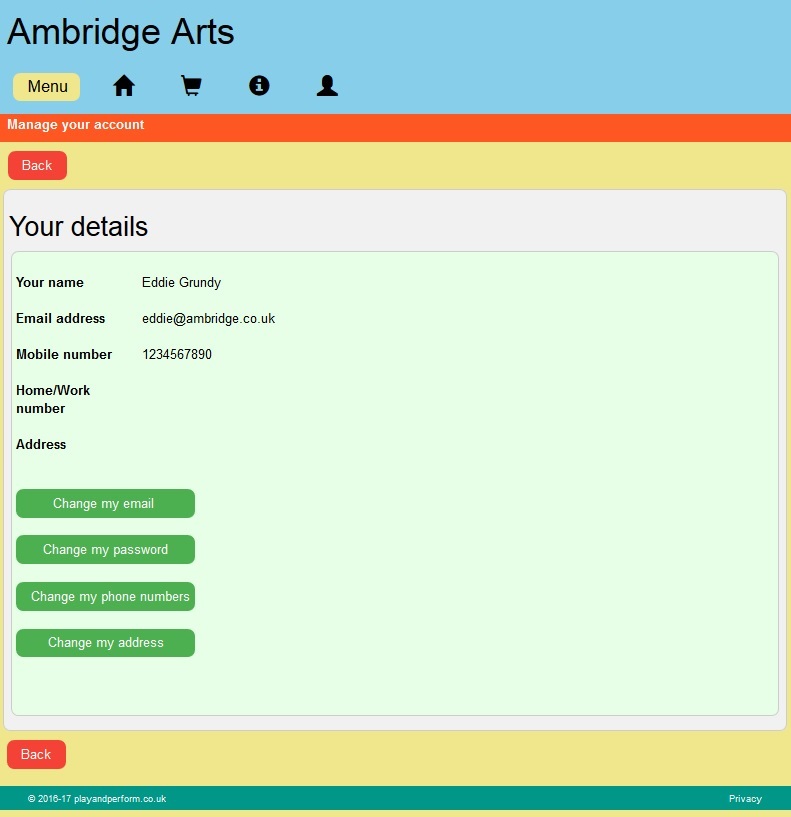
Manage My Account
You can change your personal details at any time by clicking on the 'user' icon at the top of the page and selecting 'My account'. Your current details will be shown and you make changes by clicking the appropriate button.
Remember, if you change your email address you will have to use the new one next time you log in.